
How To Make a Fairy Jar Using Polymer Clay
Share
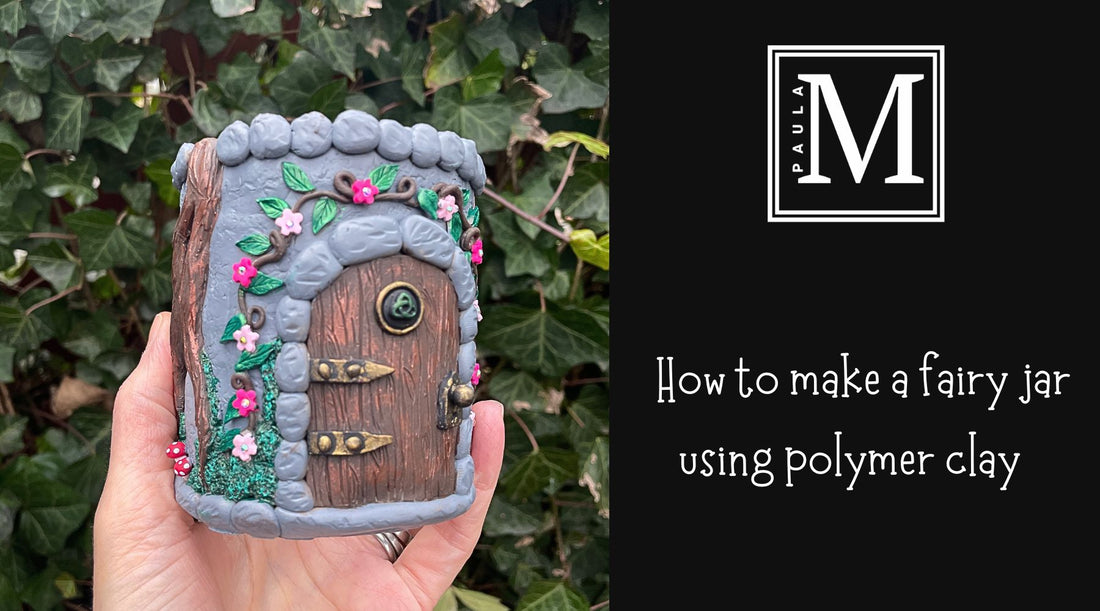
In this article I’m going to show you how I transformed an ordinary glass jam jar into a magical fairy jar using polymer clay. This step-by-step process shows how to add whimsical details like tree roots, vines, mushrooms, and moss, perfect for adding a touch of magic to any space. Below are the main stages of how I created this fairy jar, along with 3 videos that demonstrate the full process. The jar is not only a fun DIY project but can also serve as a versatile decoration or storage piece.
Applying The Clay & Sculpting
- I started by covering the cleaned jam jar with Super Sculpey Firm polymer clay.
- Using tools like an acrylic roller, dental tool, and rubber-tipped sculpting tools, I sculpted tree roots running down the jar.
- I added texture to the roots using a metal dental tool and texturized tiny balls of clay with a feather wire texture tool to represent moss.
Window and Stone Details
- I crafted windows using a small cutter and added a clay frame around them to resemble stone arch.
- Clay stones were shaped and placed around the top of the fairy door jar for added detail and I textured them with my dental tool to give them a more natural appearance.
Vine, Flower & Leaf Decorations
- Twisting the clay, I created vines that wrapped around the door.
- I used a flower-shaped cutter to punch out small flowers and leaves to add charm to the vine. Using pre-colored clay saved time on painting these flower elements later.
Mushrooms and Crystals
- Red and white clay were shaped into tiny mushrooms, which were glued onto the fairy jar using Sculpey Bake & Bond. You could also use liquid clay for this application.
- I also added 2mm flat-back crystals onto the flowers to enhance the jar’s magical appearance.
- Once I was happy with all the details, the jar was baked using a cold start (meaning that the oven was not preheated) in a dedicated small oven at 275 degrees Fahrenheit to cure the clay for approximately 1 hour.
Once the fairy door jar has cooled from the oven I was ready to paint the details.
Painting and Finishing
- In the second part of the project, I painted the tree roots, door, and vines using acrylic paint. I created a warm brown color by mixing yellow, red, and blue, which I applied to all the wood elements.
- I painted the Celtic knot detail on the door black and highlighted it with a metallic green to make it pop.
- Using metallic green and gold, I added accents to the vines, moss, and golden highlights to the door hardware, giving the fairy jar a magical, antique finish.
- Lastly, I dry-brushed copper highlights onto the door and tree roots using metallic copper acrylic paint and added white paint to the windows and added white spots to the tiny mushrooms.
Making Your Own Polymer Clay Fairy House
Creating your own fairy jar is a fun and rewarding project that lets you add a magical, personal touch to your space. Whether you use it as a decoration, a storage jar, or even as a gift, this project is a creative way to bring some fairy-inspired whimsy into your space
If you want to try making your own fairy house jar, start with the third video below which will show how to craft the fairy door itself. This is a good place to start for beginners that are not familiar with using polymer clay before jumping into the entire project right away.
If you are not so craft-inspired, You can check out my completed fairy door ornaments for purchase. Learn more about the magic of these handmade creations by visiting my blog post here: What Makes a Handmade Fairy Door Ornament So Magical?. These little doors make great gifts for those who love whimsical woodland decor and all things fairycore.
Thank you for joining me to learn how to make a fairy jar. I hope you found this fun, interesting and easy to follow. I really do hope you give it a try to make your own fairy house jar. I know there is a lot of information here so don’t feel overwhelmed, please ask me any questions in the comments below to help you get started crafting.
Have a magical time creating your special fairy door!
Resources:
How to Make a Fairy Door Jar - Part 1 - Sculpting the Jar
How to Make a Fairy Door Jar - Part 2 - Painting the Jar
How to Make a Fairy Door Using Polymer Clay
Super Sculpey Clay & Bake & Bond - Sculpey.com
Dental tool- Amazon.com
polymer clay tools: Amazon.com
Tissue blade: Amazon.com
Acrylic Roller - Amazon.com
(I am not an affiliate for any Brands mentioned)